Lifestyle
Domestic Goddesses provides a holistic life style management service. We strive to assist you in creating a harmonious well balanced life though healthy eating habits, movements, home management, home décor and refurbishments.
We will consult with you about all your personal health and home needs and set out a program to relieve the stress of the admin responsibilities of creating a home environment that gives you respite from the stresses of living a highly functioning life.

Sensible satisfying snacks
I love to snack. I need to snack. I’m not a carrots or apple kind of snacker either, so now that I am trying to be all low-fat, low-carb its making it pretty hard to find satisfying snacks.
These two have really hit the spot though. The first one is fat free cottage cheese mixed up with my spicy seed mix, scooped up with crunchy veggie sticks. Totally addictive and you don’t feel like your compromising at all.
The second is for my sweet tooth moments; which is fat-free yogurt with vanilla and almond essence, ground almonds and my artificial sweetening of choice. I sometimes even grate in some candarel chocolate to give it a chocolaty boost, but try not to do this too often.
Both are perfect to have pre-made in the fridge, so that when the snack attack comes around, it’s an easy fix rather than chips or biscuits.

One doesn’t really need a recipe for these since they are so nice to mix and match and improvise with; and can be made to suit your needs best. But if you need a guide line to get started, or a plan to get your housekeeper to make them and leave them in the fridge for you, here goes:
Cottage cheese dips with veggie sticks
½ cup of mixed seeds
½ tsp of sesame oil
¼ tsp of salt (or to taste)
¼ tsp of cumin
¼ tsp of garam marsala
¼ tsp of turmeric
A pinch of smoked paprika
A pinch of chilli powder
250g tub of fat free chunky cottage cheese
Extra salt to taste
Cucumber, carrots and peppers
In small pan on medium heat start to fry the seeds with sesame oil and spices until the seeds start to roast and make popping sounds.
Once the seeds have cooled combine them in a larger tupperware with the cottage cheese and extra salt to taste.
Cut up the veggies into sticks about 5 – 8 cm long and about 2 cm wide. Keeping them wide makes it easier to scoop up the crumbly cottage cheese. Store in a tupperware in the fridge.
Vanilla almond yogurt
2 cups of fat free plain yogurt
½ cup of ground almonds
½ tsp of vanilla essence
¼ tsp of almond essence (or less if you’re not crazy about the taste of marzipan)
Sweetener of choice (I like to use my home made xylitol stevia blend)
Combine all of the above. Add as much sweetness as you like. Store in a sealed Tupperware in the fridge.
I sometimes add grated candarel chocolate which adds that extra bit of almost guilt free decadence.
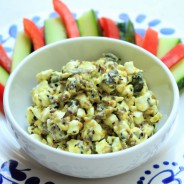
Cauliflower wraps with cheesy bean mash and salad

I’m on a health kick and will be till I shed these 4kgs which sneaked up on me. I like eating too much to restrict myself to small portions of boring bland food. So I have been trying really hard to get as creative as possible around low-carb, high-protein, high raw-veg food and yesterday I totally nailed it.
I read about these cauliflower wraps on Roost, a favourite blog of mine, months ago and only got round to trying them yesterday. I followed the recipe for the wraps exactly but I added a few drops of sesame oil (because I love the roasted flavour it adds) and some a black pepper. I was doubtful about how they would turn out as the batter was so runny; but they set perfectly. I added some colour by grilling them on high heat for a few minutes at the end. The resulting wraps are still quite tender and you need to eat them carefully to avoid tearing. They taste delicious and have an unusual but appealing texture.
You can use these to add any of your favourite fillings to. I added a filling of a cheesy bean mash, salad veggies and leaves and drizzled them with yogurt. The wraps are baked, the cheese in my bean mash was fat reduced and the yogurt was fat free but the wraps were bursting with flavour and had a richness which belied their low fat nature.
Cauliflower wraps with bean mash and salad
Makes 4 wraps
For the wraps
3 cups of cauliflower, pulsed in a blender till it forms a rice like consistency
1 large egg
4 large egg whites
½ tsp of salt
¼ tsp of sesame oil
¼ tsp of black pepper, freshly ground
Pre heat the oven to 200°C. Line two baking sheets with baking paper.
Boil the cauliflower rice for a few minutes until just cooked. Drain it in a sieve and allow it cool a little. With a spatula press the cauliflower to the sides of sieve to release more water. Alternativly place the cook cauliflower in a kitchen towel and squeeze the excess water out.
Combine the cauliflower with the remaining ingredients. With a soup ladle spoon the mixture into four piles, on the two baking sheets. Two wraps per baking sheet. With the back of the spoon spread the mixture out into large flat circles.
Bake the wraps for 10 – 15 minutes until set. Grill for a few minutes until the top wraps start to turn golden. Remove that sheet and grill the second sheet of wraps until golden. Allow the wraps to cool before peeling them off the baking paper.
For the cheesy bean mash
2 cups of cooked beans of choice, drained and well rinsed
½ a cup of water (more if needed)
4 Tbsp of red pesto (I used pesto princess)
1 tsp of chilli sauce, use your favourite
½ tsp of cumin
½ tsp of smoked paprika
½ cup of fat reduced feta, crumbled
½ cup of fat reduced mozzarella, grated
Salt to taste
In small pot or sauce pan heat up the beans and water and mash with a potato masher until it forms a rough paste. Add all the remaining ingredients and stir on medium heat until the cheese has just melted.
For the salad filling
1 cup of mini tomatoes, halved
¼ cucumber, cut into sticks
½ a pepper, cut into sticks
1 handful of baby salad leaves
Fat free yogurt, to drizzle
Arrange the wraps on large plates and fill with bean mash, salad veggies and drizzle with the yogurt, like in the picture. With clean hands fold over the sides of the wrap and eat. Have plenty of napkins available for your hands!
Thai chicken meat ball salad with zesty coriander satay dressing

I am trying to collect as many low carb, high veg, high protein recipes as I can and last week I picked up an old Food & Home magazine (September 2007) and found a recipe I simply had to make – thai chicken meat ball salad.
I made a few minor changes, like baking the meat balls and not frying them and tweaking the ingredients here and there due to what I had available. The end result was absolutely delicious. Seriously tasty while being super low in fat, high in lean protein and loads of raw veggies.
Am sure this will be a super recipe for summer entertaining.
Thai chicken meat ball salad
Serves 4 light main meal portions
Meat balls
500g of chicken mince
60ml of fresh coriander leaves, picked and chopped
125ml of spring onion, finely chopped
1 tsp of garlic, finely chopped
2 tsp of fresh ginger, finely chopped
1 tsp of chilli, seeded and finely chopped
1 tsp of lemon zest, finely grated
½ tsp of salt
¼ tsp of ground black pepper
1 large egg
Dressing
125ml coconut milk
2 Tbsp of peanut butter
4 tsp of fish sauce
1 Tbsp of the juice from the pickled sushi ginger
1 Tbsp of lemon juice
2 Tbsp of coriander leaves, washed and picked
2 Tbsp of desiccated coconut
Salad
6 baby cucumbers (or ¼ of regular cucumber), shaved into ribbons
2 medium carrots, shaved into ribbons
2 handfuls of watercress (or baby salad leaves of choice)
1 baby red cabbage (or an 1/8 of a regular red cabbage), finely shredded
½ tsp of salt
½ a cup of roasted peanuts
1 Tbsp of pickled sushi ginger, roughly chopped
Pre heat the oven to 220°C and place the rack in the middle of the oven. Line a large baking tray with foil or baking paper.
Combine all the meat ball ingredients and shape into walnut sized balls. I used two soup spoons to do this as the paste was really sticky. Arrange them on the baking tray and bake for 15 minutes. If they are not golden on top switch on the grill and grill them for a few more minutes until golden brown.
While the meat balls are baking blend all the dressing ingredients in a blender until fine and set aside in the fridge until ready for use.
Toss all the salad ingredients with the salt in a mixing bowl. Arrange on a platter or on individual plates, garnish with the peanuts, sushi ginger and extra coriander.
Arrange the warm meat balls on the side and drizzle liberally with the dressing.
Chocolate fondant – and how to get it right!
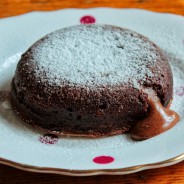
Perfecting the chocolate fondant to serve effortlessly at dinner parties is far easier than you might imagine and likely to impress the most hardened food snobs.
The recipe and method is pretty straight forward. But getting it perfect every time is all about planning and timing. So I am going to babble on a bit about all the variables and how to overcome unforeseen obstacles. The below is for unsure or nervous bakers. It really will help you to make these with confidence.
Firstly you need to select the right moulds. These moulds need to be freezer and ovenproof, they need to be able to hold not much more than 200 ml per mould. I prefer them to be rounded as the fondants slip out the moulds better but straight sided ramekins also work well.
Before serving this dessert to guests you need to do a test run. Make it for a family dinner or for people you don’t mind not getting it perfect for. The reason is that the timing of the baking is key to the success of the desert and so many things can affect the baking time. You need them to be cooked but just a little runny in the middle. The margin for error is huge here. The shape, size and material of your moulds will affect this. The cooking temperate of each oven varies 10 or 15 degrees up or down, so you need see how your oven reacts and do your timing accordingly. The temperate of your batter when you put it in the oven will also affect the baking time. If you are baking them right away, leaving them in the fridge until after dinner and then bake them or make them a few days before and freeze them (unbaked), they all will need different baking times.
So when you do your trial bake, you needn’t use the super expensive chocolate, an entry level milk or dark chocolate is fine, if economy is important for you. Make sure you have a scale which is correct – you can check it buy weighing things in your cupboard which have the weights written on them. Make sure you have correct cup and spoon measures using the South African standard. A cup is 250 ml and teaspoon is 5 ml. The American measures are slightly different. Make sure your eggs are the size specified on the recipe and are at room temperature. Measure all your ingredients exactly and follow the method exactly.
Of the 6 moulds, once they are filled with the uncooked batter, place 2 in the freezer, so you can bake them from frozen to see how long that will take to bake.
Of the 4 remaining moulds, bake them in a fully pre heated oven. The little light will have switched off once the oven reaches the temperature set on the dial. Use the top and bottom heat setting, do not use the fan. Use a timer when timing your baking. Bake them for 12 minutes, then check them, if they are wobbly, keep on baking. The tops need to have just gone crusty; when pressed it needs to have give but not break through to the runny batter. Keep adding 2 mins to the baking time and keep track of this so you remember how much time you have added.
If you are unsure and want to check one, take it out with a thick dry cloth. With the tips of your fingers (if you can manage that) or a butter knife, wiggle the cake a little to loosen it from the sides. Place a side plate over the top of the mould and flip the plate and mould, upending the cake. Tap it or shake it a little if it doesn’t slip out. If it already cracks open and batter starts running out, it needs to bake more. You can simply slip it bake in the mould and carry of baking, it won’t look great but will still taste amazing. The cakes are perfect once about 50% of the batter is cooked and 50% is runny. You will let the cakes stand for about 5 mins at least before serving so they will carry on setting a little more.
While the cakes are resting out the oven, it leaves time for you to prep the side plates, berries, ice cream or whatever sides you plan to serve with the fondants. Once the fondants are un-moulded a dusting of icing sugar through a sieve on top looks great.
Whatever your perfect baking time ended up being, you should add about 5 minutes onto the frozen fondants baking time. But don’t guess, check it, timing everything exactly. Bake them straight out the freezer, no need to defrost them.
I like baking them from frozen as you can make them way in advance (like up to 2 months) leaving you free for other things on the day you are entertaining. All you need to do is pop the oven on to pre-heat when you sit down for mains. Once mains are cleared you pop the desserts in the oven and while they bake you can get the plates and sides ready and serve your guests a restaurant quality dessert. I like to have a few extra just in case one or two are not perfect.
Now this seems like an awful lot of preparation, ifs and buts – it really isn’t as complicated as it seems, I just wanted to give you as much info as possible to ensure that they would end up perfect!

Chocolate fondant
Serves 6
6 metal or ceramic pudding bowls or ramekins
melted butter, for greasing
cocoa powder, for dusting
115g of butter
140g of dark chocolate
2 extra large eggs, beaten
1 extra large yolk, beaten
1 cup of castor sugar
½ tsp vanilla extract
1 cup (minus 2 Tbsp) of cake flour, sifted
Heat the oven to 200°C and place the rack in the middle of the oven. Brush the ramekins sparingly with melted butter and place them in the freezer to harden, brush them again and let that harden again too.
Melt the butter and chocolate on low heat a saucepan. Remove from the heat and stir, then set aside to cool a little.
In a large mixing bowl whisk the eggs, sugar and vanilla until pale and frothy. Add the chocolate mixture to the egg mixture, little by little, beating in between. Fold in the sifted flour.
Dust the cold ramekins with coco powder. Place them on a baking tray and divide the mixture between the moulds – each one ¾ full. Place on a baking sheet and bake for 12 – 15 minutes, until the tops have set. Remove from the oven and allow them to stand for a further 2 – 3 minutes. Get your plates and sides ready. Invert and tip out onto serving plates. Serve immediately with vanilla ice cream and fresh seasonal berries.
Mini crustless quiche – so quick (and almost guilt free).

Low or no carbs seem to be all I hear about these days. But I am crazy for my carbs and shudder at the idea of cutting them out. I have however discovered a few recipes where I don’t miss the pastry crust or mashed potato side at all.
For many clients I have designed carb free, high protein recipes, which is actually pretty easy when you’re a meat eater. But now my husband (the vegetarian) wants to start the low carb, high protein vibe, and I’ve found it pretty tough to find enough lean high protein foods without serving him egg whites morning noon and night.
The veggies are easy of course and so far my go to lean proteins have been egg whites, fat free cottage cheese and raw vegan protein powders. I’ve been avoiding soya products, for various reasons. If you want to read more about the perils of soya products click here. We eat Frys as a treat but have added it into our fast food guilty pleasure category and not as part of our staple diet.
So before this gets really boring, it hasn’t been easy doing this for my veggie boy but these crustless mini quiche have a been such a win. I’ve taught our housekeeper to make them and it’s great having them in the fridge to snack on or for a quick lunch with a salad on the side.
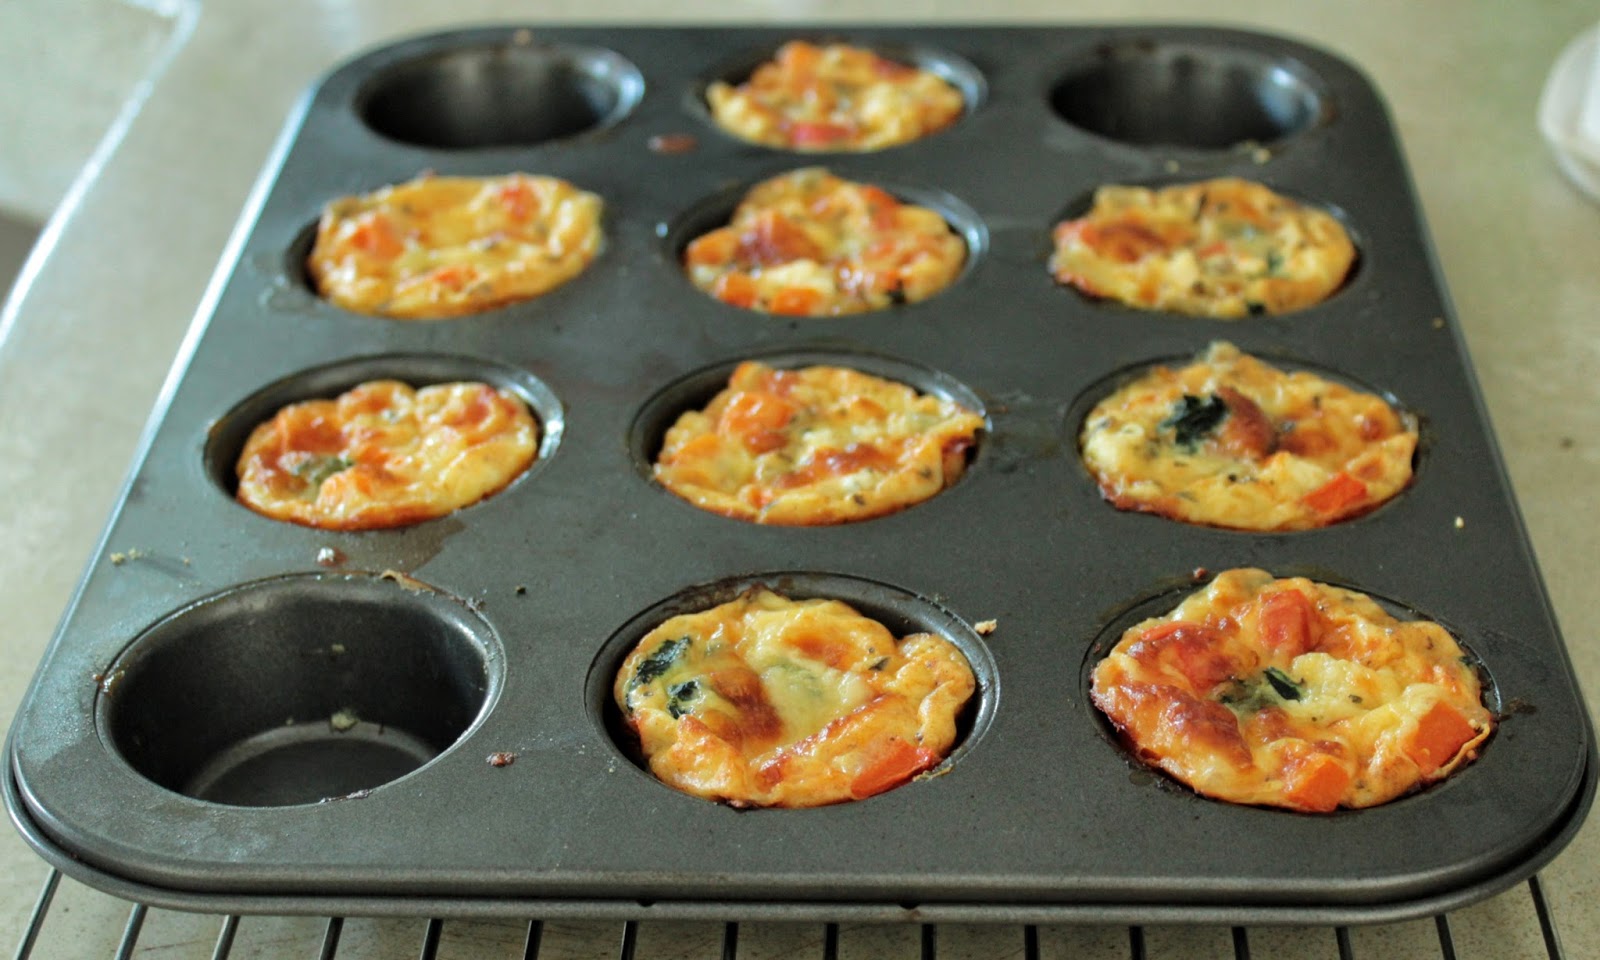
Mini crustless quiche
Makes about 12 medium muffin sized quiche
150g crumbled feta or 250g of bacon, sliced and fried till crispy
1 cup of mozzarella cheese, grated
½ a cup of spinach – steamed, drained, squeezed and chopped
½ a cup of butternut – cut into small squares and steamed
¼ cup of red pepper, cut into small squares
3 large eggs
1 cup of milk
1 tsp of vegetable/chicken stock powder
1 tsp of Dijon mustard
A pinch of mixed spice
¼ tsp of salt
¼ tsp of black pepper
Grease a 12 insert muffin tin. Set your oven to 200°C and place the rack in the middle of the oven.
Crumble the feta (or fry the bacon), grate the cheese and prepare the veggies. Whisk up the egg, milk and seasoning in a container with a pouring lip so you can pour the mixture easily. Loosely fill each muffin insert with the feta/bacon and veggies. Top them off with the mozzarella. Fill each mould with the egg mixture and bake until the egg has set and is lightly golden on top, about 15 – 20 minutes.
Allow to cool before unmolding the quiches.
These quiches freeze beautifully. Re-heat in the microwave or oven.
Creamy tuna dip

For someone who eats most things the one thing I am a bit picky with is fish. I love fish if it is fresh fresh fresh and prepared with care. If there is a hint of that been standing too long fishy smell, my stomach churns. It may not necessarily be off yet, but I most certainly will be off it.
My 100% love it, go to fish will always be good old tinned tuna. It may not be fashionable but it is something that just hits my comfort food spot. I love a tuna pasta, tuna salad, tuna mayo as a sandwich filling and tuna cream as a dip or spread.
I taught my tuna cream recipe to a client last week and have made it for myself at home twice since then. It’s quite addictive. It is great served as a snack before a dinner party or at a braai. Great to have in the fridge to snack on with carrot sticks, rice cakes or in a sandwich. And kids love!
Tuna cream dip
Makes about a cup and a half of dip
2 x tins of tuna (240g drained weight)
1 Tbsp of chopped spring onion
1 Tbsp of capers
½ tsp of lemon zest
½ Tbsp of lemon juice
½ Tbsp of balsamic vinegar
½ Tbsp of soya sauce
1 Tbsp of chopped parsley and/or dill
4 Tbsp of mayonnaise
1 Tbsp of tomato sauce
Salt and pepper to taste
Blend all the ingredients to a fine creamy paste. Serve with bruschetta and crudités.
Express Coq au vin
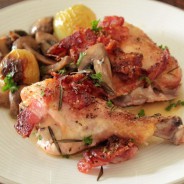
I have been so busy lately, I just have not had the time to blog and I feel terrible about that. I love blogging but it certainly is time consuming. So today I decided not to dither about writing too much about the dish I posting today. In short, a client sent this recipe from Bill Granger to try. I did, it rocked.
I tweeked the ingredients a little to make it easier to make in South Africa but mostly its the same. Quick, tasty and perfect for guests or a family meal. Try it!

Coq au vin
Serves 4
2 Tbsp olive oil
8 chicken pieces, with skin and bone
10 shallots (or pickling onions), peeled
a few thyme sprigs
2 rosemary sprigs
250g streaky bacon, thinly sliced
250ml white wine
2 tsp of garlic, roughly chopped
1 Tbsp of butter
250g mushrooms, sliced
1 small handful of parsley, roughly chopped
Pre-heat the oven on grill and high heat. Rub the chicken pieces with oilive and salt to taste. Arrange the chicken pieces in a large casserole dish or roasting pan and scatter with the shallots, thyme and rosemary. Roast in the oven for 10 – 15 minutes until the skin starts to colour and crisp.
Add the bacon, wine and garlic and bake for another 25 – 30 minutes on 200°. Turn off the heat, open the oven door a crack to keep warm while you cook the mushrooms.
Heat the butter and remaining tablespoon of oil in a large frying pan over a medium heat. When the butter is foaming, add the mushrooms and fry for 5 – 8 minutes until they have reduced to at least half their size and any water has cooked away. Season with salt and a dash of soya sauce. Add the mushrooms to the chicken, scatter with parsley and serve.
Based on a recipe from Bill GrangersSaturdayKitchen
Revisiting an old favorite

I have been craving and eating a lot of fish recently, which is odd, cause I’m not the biggest fish or sea food fan. This Sunday I spent a lazy day at home doing a home spa and just chilling, so I didn’t want to spend much time cooking. This old favorite of mine popped into my head and man did it hit the spot.
It’s pretty light but has all the rich flavours of a comfort food pasta dish. Although it may sound like an odd flavour combination, they just work so well together.
Creamy tuna veggie pasta
Serves 2 large portions
250g of your favourite pasta (mine is Barilla spaghettini – the thin one)
1 Tbsp of oil
1 small onion, cut in half and thinly sliced in half rings
1 can of tuna chunks (in brine), drained
200g baby marrows, halved and thinly sliced into ribbons
½ a red pepper, thinly sliced
Freshly ground black pepper to taste
1 cup of crumbled Feta Cheese
¼ cup of milk
Get your pasta cooking according to packet instructions. Heat the oil on high heat in a medium pan and fry the onion for a minute or two. Add the veggies and fry gently for a minute or two, add the tuna. Turn down the heat. Finely crumble the feta over the mixture, add the milk and gently stir until the feta has melted and the sauce has slightly thickened. Season with black pepper. Pour the sauce over the cooked pasta.
Kids love chicken schnitzel (most adults too!)
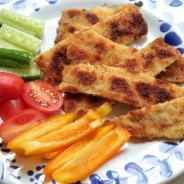
The one dish all the kids unanimously love are chicken schnitzel but I had never made them before. Today I experimented and think the below recipe is just delicious. Kids and adults alike will just love them. Super tender and well flavoured chicken, coated in golden crispy batter.
The process is pretty messy in terms of the amount of dishes one needs to dirty, using ones hands to batter and frying in batches, so make sure your maid is coming the next day.
Prep up all your side dishes, set the table and get yourself well organised before frying the schnitzel. All the planning will be well worth it when you see the enjoyment of your family and friends.
Meaty samp & beans stew

My husband has been traveling a lot recently, leaving me aaaall alooooone at home… poor me!
I try to make the best of it. I watch all the chick flicks and series I need to catch up on. I have girly suppers with lots of giggling and silliness. And I eat meat, lots of meat! My husband is a full vegetarian so I only have meat in the house if I am catering or when he’s away.
The one meaty dish I made recently is a dish I have loved since childhood is a samp and beans recipe with meat. I have taught my housekeeper to make a delicious vegetarian version which is the one we always eat. But while my husband was away, I thought it was time to make a hearty samp and bean recipe with meat.
It was delicious! Add to it a quick chopped salad and its a fabulously balanced, healthy and economical meal too.

Samp and beans recipe with meat
Serves 6 – 8 (it freezes beautifully)
2 cups of dried samp and beans
1 cup of sugar beans
2 Tbsp of oil
2 large onions, finely chopped
3 cloves of garlic, finely chopped
500g beef shin off the bone, diced
1.5 liters of boiling water
2 oxtail stock cubes, crumbled
2 tsp of smoked paprika
2 tsp of mild curry powder
1 Tbsp of soya sauce
1 tin of chopped tomatoes
2 cups of grated carrot
Salt and pepper to taste
How to cook samp and beans: Soak the samp and beans in water over-night or for a few hours. You can cook them when they are dry but it will just take longer and you will need to add more water to the recipe.
In a medium-sized heavy-bottomed pot with a lid, fry the onion and garlic in the oil. Add the beef and fry for a few minutes. Add the water and stock cubes. Drain and add the samp and beans.
Add all the remaining ingredients except the salt a and sugar. Simmer for at least 2 hours, with the lid on stirring from time to time, until the beef and beans are soft and the sauce has formed a thick gravy. Season with salt and sugar to taste and allow this to simmer for a further half an hour or so until the flavors are fully combined.
Now you have a delicious samp and beans with meat recipe which you can serve with a chopped salad of your choice to make it a little more healthy.
Pin for later!


